Rowan Borthwick

Art & Design, Level 3, Yr.1


Leave a comment

Tree Rings

These glowing tree trunks were designed by Judson Beaumont, Straight Line Designs, after being invited to attend the Summer Lights show on Salt Spring Island. I really like the simplicity of using natural Pine Beetle wood, with the contrasting illuminated color-tinted resin tops.
Beaumont:
“My rule is: if you can draw and design it, you can build it. I love it when someone tells me that, ‘You cannot build that’ or ‘No one would want that’. These words only encourage me more.”

Straight Line Designs Inc.

We’ll be calling these pieces “Tree Rings” when we debut them in the Summer Lights show at duthie gallery on July 1st.

The Tree Rings came about after we were invited once again to take part in the Summer Lights show on Salt Spring Island. Since we have been working with large amounts of split Pine Beetle wood recently, we saw it fit to take our idea for the colour-tinted resin tops to the outdoors with these illuminated pieces.

During the day they are a nice perch for your feet or your drink or your . Simple and playful.

At night however, they transform into something else entirely. Illuminated from within, the different coloured tints in the acrylic resins flood the surrounding area with a bright and lively luminescence .

Summer Lights features illuminated works of  art in the environment, artifice in nature, pieces of public art made to be visible in…

View original post 86 more words


Leave a comment

A little bit of summer…

‘Another fine fest’, Ulverston’s latest festival’s, flash mob was organised by Jenny Street (Matrix circus) and other Ulverston enthusiasts.  The flash mob consisted of an amazing pie fight. Inspired by Laurel and Hardy.

Work at ‘We Are All Trees’:

This slideshow requires JavaScript.


Messing around in 3D:

CSC_0030kk.l

Discussing the speaking chins on Friday night and then coincidentally finding googly eyes at breakfast:


Leave a comment

3D Evaluation

To start the project we created masks and helmets using the medium of paper and cardboard.  When starting this, I didn’t look too much into sketching at first, but threw down some ideas. so I
I wanted to go for a realistic mould so we jumped in with papier mache and got a friend to cover my face. We got quite a sturdy model, but you can imagine how messy/painful it was… so we moved that over onto an existing mould to

I curled up thin card for hair, and used the papier face mask to fit in under the cardboard head band. So it was both mask and helmet/extravagant hat. I quite enjoyed using this medium, although I haven’t had any further interest in using it in 3D work since.

Creating wire sculptures. At first my idea was to create small wire animals such as the tortoise. But I also created a wire sculpture of an Owl to use for the animation project. I really enjoyed using this medium the second time round, but and the injuries were frustrating. I used jaggered edges on thin aluminium and ring pulls. The original idea was to bring this presumed ‘junk’ out of the bin (in  animation) and filmed it transforming into the owl and moving away. Taking these photos and night though was rather difficult, due to the movement of light and it taking a good while for all the metal feathers to stop moving.
The animation that I created with the sculptures head in front a white background was when I was adding all the

We used Kendal Colleges new 3D room  for the first time and made two
We created clay relief art on the inside of ice cream sized box’s. We did this in reverse negative/positives to get the depth we wanted in the actual mould
and the wood carving machinery

Some of the tasks for summer:
Completing the batman 3d statues. These are about 6cm and made from sculpy. First we made meta armature from 2 pieces of thick wire bent into the the general shape of a stickman. Covered these in tinfoil,  masking tape and bake the sculpy ready to paint.

Batman inspired mask based mask/item of clothing.

(…)


Leave a comment

Creating a sculpting tool: 3D Room

First we drew out a basic design on a piece of soft wood, then cut it out using a bansaw.

We used a table and circular sander to define our individual tools.

Then finished them off, hand sanded.

H&S – 

  • Band saw, wear goggles, make sure the guard is fitted and set correctly and make sure dust extraction is on.
  • Belt sander, wear goggles, make sure the guard is fitted and set correctly and make sure dust extraction is on.

This slideshow requires JavaScript.


Leave a comment

Progression

I plan to calculate my Extended Diploma grade by adding up past results using the grading system:

Pass 70
Merit 80
Distinction 90.
You then compare the final number with a table of grades. These range from PPP to D*D*D* (initials for pass and distinction). This will give you a pretty close idea to what your final grade is going to be. Potential Universities like to have this information.
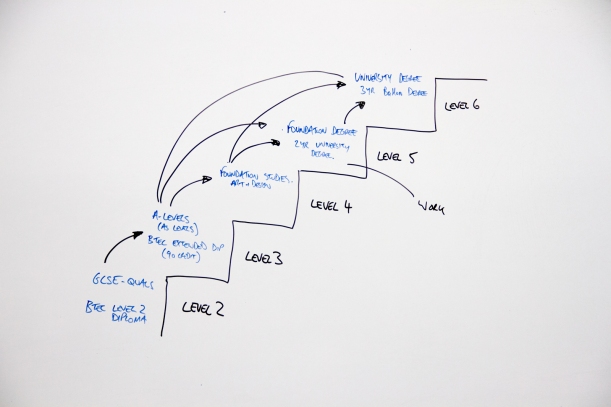
After completing the level 3 qualification there are a few different qualifications available to you. Here’s a drawing showing the levels of possible course:

img_0325After lever 2, we have the choice to leave education and enter employment when ever we want. This also means we can re-enter education later on in life.

To apply for university you have to go through UCAS. They’re the middle man, and handle all the applications and arranging meetings.
When going to the meetings, they will ask for a portfolio and may ask the applicant to complete a mini project within a few weeks- tailored for the individual university.

You can find out about university open days and events for more information by looking through ucas to find days.


Leave a comment

Animation: Creating the owl

I’ve decided I would like to create an animation of a bird, but out of ring pulls. I thought the ring pulls could emerge from out of the ground and pile together, working their way up into this large winged creature.

Sketches…


experimenting with ring pulls for wings…

Eyes…

k
Because I’ve note quite finished with the owl model yet, I decided to spend today experimenting with stop motion while finishing off the head. This means in my lesson with Dom later, I will be able to learn how to do stop motion on abode premier.

This slideshow requires JavaScript.

Animation:

75 pictures= 4seconds of film. So, so far 18 frames a second.

Expanded:

I’ve  decided for the finished sculpture I don’t want it to be complete. This is because all the bits of scrap rubbish that make this owl will come out of the bin. So I think an incomplete sculpture would be more appropriate. But not forgetting all the main features. Update: