Instructions for reference:
Rusted paper:
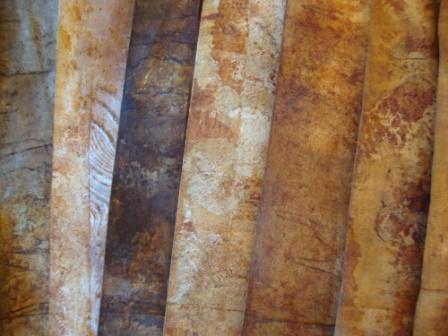
A friend mentioned “rusted paper” to me, so i looked it up. It makes for an amazing rustic old fashioned look using the ingredients –
Indian ink, tea bags, Iron (sulphate of Iron) Ferrus sulphate and caustic soda.
I’ve used Tea to stain paper before, but never tried the others. I plan to give this a go, as well as marbling the pages.
How to:
Prepare sheets of paper and dip them in the various chemical baths. Do this in different sequences to achieve different effects. The colour & patterns of the paper will only start to appear as the paper dries and the chemicals react with one another.
When each sheet is dry, rinse it with clean water – the colour will not wash off.
Indian Ink (from art supply shops) – 1/2 to 1 teaspoon of indian ink in 2Lte. water.
Tea (bags) – 25 tea bags in 2 lte. boiling water. Brew in ice cream container & store stock solution in large plastic bottles.
Iron (Sulphate of Ion) Ferris Sulphate – such as ‘Searles’. Sulphate of Iron 500g (From garden supply shops). 250g in 5lte. water (100g in 2lte.water).
*Never pour water onto crystals* place water in a bucket and then add the crystals.
Caustic soda – from supermarkets. 3/4 to 1 tablespoon in 2Lte water.
*Never pour water onto crystals*place water in a bucket and then add the crystals.
Given health and safety guide:
-Always wear rubber gloves
-Wash spills under running water, or apply vinegar to neutralise caustic.
Research:
http://celiawil.wordpress.com/
http://www.snipsandsnailsandpuppydogtails.com/search/label/books?updated-max=2013-06-21T11:26:00-04:00&max-results=20&start=6&by-date=false
http://tondro.com/blog/category/leaf-monoprint-process/
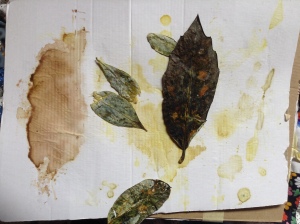
Eco dye:

Threadborne tutorials:
“To make my book, stacks of papers were layered with leaves and metals, sprayed with vinegar and water to rust the metals, then steamed over boiling water to extract the “eco” prints. Plant pigments combined with rust to deposit prints directly on the paper in a range of greys, charcoals and blacks as well as natural rust and plant colors.”
Tools and Materials to Make an Eco Printed Book
Tutorials
For the book pages
140 lb. watercolor paper, folded in half.
For the book spine
80/90lb artist paper, folded into an accordion with 16 panels.
To print the papers
Spine:
Loose black or rooibos tea leaves (dry)
Flat, scrap metal pieces.
Pages:
Tannin-rich leaves such as maple, oak, walnut etc
To develop the rust, spray a bottle filled with 50/50 mixture of white vinegar (5% acid) and water.
To steam the prints: covered cooking vesse (old meat roster) filled with three inches of water and fitted with a raised rack, large enough to hold the papers (do not reuse for food prep)
Enclose the paper between pieces of cardboard and weigh down with bricks, dishes, anything heavy you may have to hand.
Heat: Kitchen stovve, portable hot plate, camping stove. Tongs and groves for handling the hot material.
Technique:
To print the papers
- Make two stacks of papers each with three sections folded 4” x 4”
- Insert two or more tannin-rich leaves and a small flat piece of metal inside the fold of each section and also between each of the sections in the stack (I used maple and chokecherry leaves for their contrasting shapes)
- Spray –soak the stacks with the vinegar-water mixture.
- Place one piece of the 4” x 4” cardboard under and one on top of each stack.
- Wrap the stacks around with cotton string and tie securely.
- Place the two stacks side by side on the steaming rack
- Place the weights on top of the stacks
- Bring the water in the pot to a boil and steam for 60 – 90 minutes
- Turn the bundles every thirty minutes. Steam longer if the desired print is faint, shorter if too strong.
10. When complete, turn off the heat and allow the bundles to rest in the pot until cool or overnight
11. Unwrap the bundles, discard the plants but reserve the metal pieces for other prints.
12. Spread the papers out to dry. Remove stuck-on plant material
13. Once dry, flatten papers under weights.
Tips
- To help fix the colors, pre-soak papers for two hours or overnight in a solution of one teaspoon of alum acetate or potassium alum sulphate to four cups of water.
- Rusted metals alone print colors in the orange-rust-brown range on papers.
- Leaves may be layered on top of rust printed papers and processed a second time. This method tends to print tannin-rich leaves as black on top of rust.
- Leaves printed alone without metals tend to print colors depending in their growth season: greens, blues, purples, yellows, browns are common
- Natural dye powders can be sprinkled onto papers or diluted and painted on selectively, as can plant inks such as walnut
- Dye assistants such as ammonia, cream of tartar, iron or copper sulphate can be painted on selectively to induce color shifts.
Spray papers with a deacidifier on completion of the project.
Resources for bookmaking and natural dyes
- Alisa Golden: “Creating Handmade Books”
- Shereen Laplantz: “Cover to Cover: Creative Techniques for Making Beautiful Books, Journals and Albums”
- For a complete line of supplies and information related to natural dyes, dye assistants and reference materials, see www.maiwa.com
- Jenny Dean (with Karen Diadick Casselman, consultant): “Wild Color: The Complete Guide to Making and Using Natural Dyes”
http://wendyfe.wordpress.com/ – Threadborne